Image Map
Showing posts with label nutella. Show all posts

Friday, April 12, 2013

Avocado Protein Brownies (gluten free)


Occasionally it is a good idea to take desserts and give them a healthier spin to give your body a break.   Now I am sure not having anything would make more sense but that seems a little unreasonable. No?
Okay maybe not so unreasonable and in fact my naturopath has told me I have to cut back on the sweets.       Otherwise this baby weight will be stuck with me forever.  It is however a fairly difficult task when you are a food blogger, and even more difficult when this weekend is the first Food Bloggers of Canada Conference.   I am very excited about this conference, tons of great Canadian food bloggers, knowledgeable speakers and sessions and some serious serious eating!   The work outs will have to be doubled next week to account for the damage that might be done.

This will be the most time I have spent away from the little one.  Yikes.  I will be going home each night but she will be asleep when I get home and probably still sleeping when I leave.  So the hubby will be on full baby duty until Sunday afternoon.   I am leaving two pages of notes for her daily schedule so he should be okay.   He might throw all my week and a half of sleep training out the window but I will deal with that on Monday, I have a conference to enjoy.

Since I did know the diet is out the window this weekend I made these skinny brownies to get me through the week.  Gluten free, lots of healthy fats, no refined sugars and extra protein.  Brownies I will easily have two of.

Monday, February 4, 2013

Chocolate Cream Cheese Nutella Cups


So if you live in the North you take your weather predictions on February 2 from a groundhog.  There is Wiarton Willie here in Canada and Punxsutawney Phil in the US.  If the groundhog sees his shadow they basically say there is 6 more weeks of winter.   Well guess what!!  Neither groundhog saw there shadow = Early Spring!!  Yippee. Now I don't normally take my weather predictions from animals but I am going to cross my fingers that in this case these groundhogs know what they are "talking" about.  Please come early spring.

Although it is still quite cold out there February 5th is a great day.  It's World Nutella Day!  Unless you are allergic to nuts I think most people love this stuff.   Nutella always reminds me of my friend Sebastian who brought Nutella on a trip to Honduras we went on a few years back.  What a smart guy, it came in quite handy when having our morning waffles.  Any time I bake Nutella treats, I often bring him some or save him some.  Sebastian, come on over I still have some left!

I wonder what other wonderful desserts are out there in blog world today!

Sunday, December 30, 2012

10 days of Cookies - Day 8 - Nutella Haystacks


We had one more Christmas dinner to attend on Thursday night.   A dinner with our extended family - two of our friends and their family.  We sometimes get together with them Christmas eve but one of our friends parents and sister were in Cuba until boxing day so they moved their dinner.  It worked out really good for us as we wouldn't have been able to attend Christmas eve due to family commitments   This dinner was nice as well as our friends cooked up some filet mignon with several tasty sides.   Sammie behaved herself and we had a great time.   One of these friends is our nutella loving friend,  so I always feel it is my food blogging duty to bring him some nutella based treats.    Of course being the unorganized person I am these days I was ill prepared and did little planning.   I then remembered one of my favorite cookies that my mom makes and put on a nutella spin!

Nutella Haystacks

INGREDIENTS:

  • 1/2 cup unsalted butter
  • 1/2 cup almond milk
  • 1 1/3 cup granulated sugar
  • 1/3 cup cocoa powder
  • 1 tsp vanilla
  • 1/2 cup nutella
  • 1/3 cup peanut butter
  • 3 1/3 cup quick oats
INSTRUCTIONS:
1) Combine butter, milk, sugar and cocoa powder in a medium-large sauce pan.   Bring to a simmer for a few minutes until sugar is dissolved.
2) Remove from heat and add vanilla, peanut butter and nutella. Stir together until melted together.
3) Stir in oats, potentially adding more if mixture seems too wet.
4) Using a small scoop place rounds a parchment lined baking sheet.  Fill sheet and place in fridge until cool and set.

MEG's RATING : D-EEEE-LICIOUS!


Saturday, September 29, 2012

Nutella Pear Cakes


I figured out a new experiment with my baking and work.   I happen to sit about 15 feet from the coffee/kitchen area so I can here mostly everything from my little cube.  My bake goods do often make it into work otherwise I would eat way to much myself as would the hubby.  Normally I just put the desserts right on the cabinet by my desk as it tends to get a lot of traffic.  The day I went to bring these cakes in, my director brought in donuts. A weekly ritual he seems to have started when we hit that budget season and I am not complaining.   Since I didn't want to conflict with the donuts I decided to put my little cakes into the lunch area on a plate with a note that simply said Nutella Pear Cakes.   I didn't say who made them and luckily no one saw me drop them off so these little cakes were just left there for the taking.  So the cool thing was every time some one came into the lunch room I could hear there reaction.  Most people were immediately intrigued, and then they tried them and I heard the rave reviews.  As the cakes diminished quickly I then heard people who got a cake ask other people if they did and then say "oh too bad, they were so good".     This is great, until people catch on the baking is mine this will be a great way to experiment for the next few weeks.

Nutella Pear Cakes
(makes 18 mini cakes)

INGREDIENTS:

  • 1 1/2 cups unbleached all purpose flour
  • 1/2 cup quick oats
  • 1/2 cup packed brown sugar
  • 2 tsp baking powder
  • 1/4 tsp salt
  • 1/4 tsp cinnamon
  • 1 1/2 cup peeled chopped pear ( I used Bartlett)
  • 1/2 cup semi-sweet chocolate chips
  • 1 large egg
  • 2/3 cup buttermilk
  • 1/2 cup coconut oil, melted
  • 2/3 cup nutella

INSTRUCTIONS:
1) Preheat the oven to 375F.  Grease with butter or spray with nonstick spray a mini bundt pan
2) Combine flour, oats, sugar, baking powder, salt, cinnamon, and pear in a large bowl.  Mix together and and make a well in the center. 


2) In a large 4 cup measuring cup or medium bowl add buttermilk, egg, coconut oil and nutella.  Whisk together until well combined.  Pour into the well. and add chocolate chips.


3) Fold wet mixture into dry until just moistened.  Fill each pan with about 3/4 full.   Bake about 18-20 minutes until a toothpick comes out clean.  Let sit 3-5 minutes in pan , then turn over onto a cooling rack.   Store in a airtight container for up to 3 days.


These little cakes were so moist and super easy to make.  The nutella was subtle but noticeable adding a nice nutty addition.  Breakfast or dessert,  I think it would be either one.  :-)

MEG's RATING : D-EEEEE-LICIOUS


Sunday, September 9, 2012

Mini Doughnut Bites


Can you believe it is September already?  Everyone is back into their fall routines and traffic is back to being busy.  My routine doesn't really change that much from summer to fall but since the last weekend may have been one of the last few for good weather,  we decided to go to the cottage for a few days.  It was a quite weekend with just the hubby and his parents but it was nice and relaxing.   Reading, resting and a little bit of card playing.

This relaxation was short lived though as soon as we walked in the door.   We arrived home to a leak coming from our water feed to the fridge.  This leak left a nice pool of water in the kitchen but then also leaked into our basement - our newly finished late last year basement.   This water had been dripping through the pot lights in the ceiling, leaving another pool of water in the floor, which then soaked into the carpet.  So this put a wrench into the rest of the weekend as we completely got side tracked cleaning this up and didn't make it to home depot to pick up what we need for Monday's tasks.    Overall the damage is pretty minimal though, the ceiling may need a small touch up in two areas and the laminate floor is a bit rigid in one area.   If we had stayed at the cottage any longer than we did I shutter to think what damage might have happened.

Since my Monday plans were derailed and I figured my hubby and I need some cheering up I decided to make us some mini doughnuts and then bring the rest into work.  My plans for getting this post out early last week also got derailed from a busy work week and making cupcakes for a wedding this weekend. Better late than never.

Mini Doughnuts Bites
(adapted from Home Cuisine - Holiday issue)

INGREDIENTS:

Doughnuts
  • 1 1/2 cups unbleached all purpose
  • 1 tsp baking powder
  • 1/2 tsp salt
  • 1/2 tsp cinnamon
  • 1/4 tsp baking soda
  • 3/4 cup butter
  • 1/3 cup granulated sugar
  • 1/3 cup brown sugar, packed
  • 1 egg
  • 1/2 tsp pure vanilla extract
  • 1/2 cup milk
  • 1/4 cup Greek yogurt (I used 0% fat)

Coating  (each amount will coat about 1/3 of the doughnuts)
  • 1/2 cup confectioners sugar - use all by it self
  • 3/4 cup granulated sugar
  • 1 tsp cinnamon
  • 1/3 cup butter, melted - for dipping
  • 2 tbsp butter - for chocolate glaze
  • 1 tbsp heavy cream
  • 1 tsp corn syrup
  • 1/3 cup nutella
  • approx 1 cup confectioners sugar - for chocolate glaze

 INSTRUCTIONS:
1) Spray with non stick or grease a 1 1/2 mini muffin pan.   I believe I yielded about 30 doughnuts.   Preheat the oven to 350F/
2) Combine flour, baking powder/soda, salt and cinnamon in a medium bowl.
3) In a large measuring cup combine milk and yogurt
4) In a large bowl or your mixer bowl beat together butter and both sugars.  Add egg and vanilla and beat to combine.


5) Add flour and milk mixture - alternating 3 parts flour / 2 parts milk mixture.  Beating on low after each addition and scrape down the sides as needed.


6) Using a small ice cream scoop to add the mixture into the muffin tins.  Bake until muffins are golden and a toothpick comes out clean - 12-14 minutes.
7) Let muffins cool in pan about 3-5 minutes, then transfer to a wire rack.
8) While muffins are baking create/prepare the coating mixtures.    Place sifted icing sugar in a small bowl (big enough for rolling doughnuts)  and set aside.    Combine granulated sugar and cinnamon in a small bowl (big enough for rolling doughnuts),  set aside.
9) Chocolate glaze - In a small sauce pan combine butter, cream and corn syrup, warm on low until butter melts, stirring occasionally.  Add Nutella and stir until melted.   Remove from heat and add approx 1 cup of confectioners sugar, 1/4 cup at a time, until mixture is smooth and thick. You may not need all or may need more confectioners sugar.     Let 3-5 minutes to cool a little bit.  
10) When still warm roll the doughnuts in the icing sugar and set on a wire rack over a baking sheet to catch the rest.


11) For the cinnamon sugar coating,  when doughnuts still warm, roll in butter quickly, then roll in cinnamon sugar.   Place on the wire rack to dry.


12) For the chocolate glaze, dip the top of the doughnuts into the chocolate glaze and place on the wire rack to dry.   I did this coating twice as my glaze was a bit thin,  adjust the thickness with the icing sugar.
13) EAT, EAT, EAT!

The cinnamon sugar ones were the winner but they were all delicious.   Moist and fluffy with just a tiny hint of cinnamon in all of them.   Much better than store bought doughnuts.

MEG's RATING: D-EEEEE-LICIOUS!


Monday, June 25, 2012

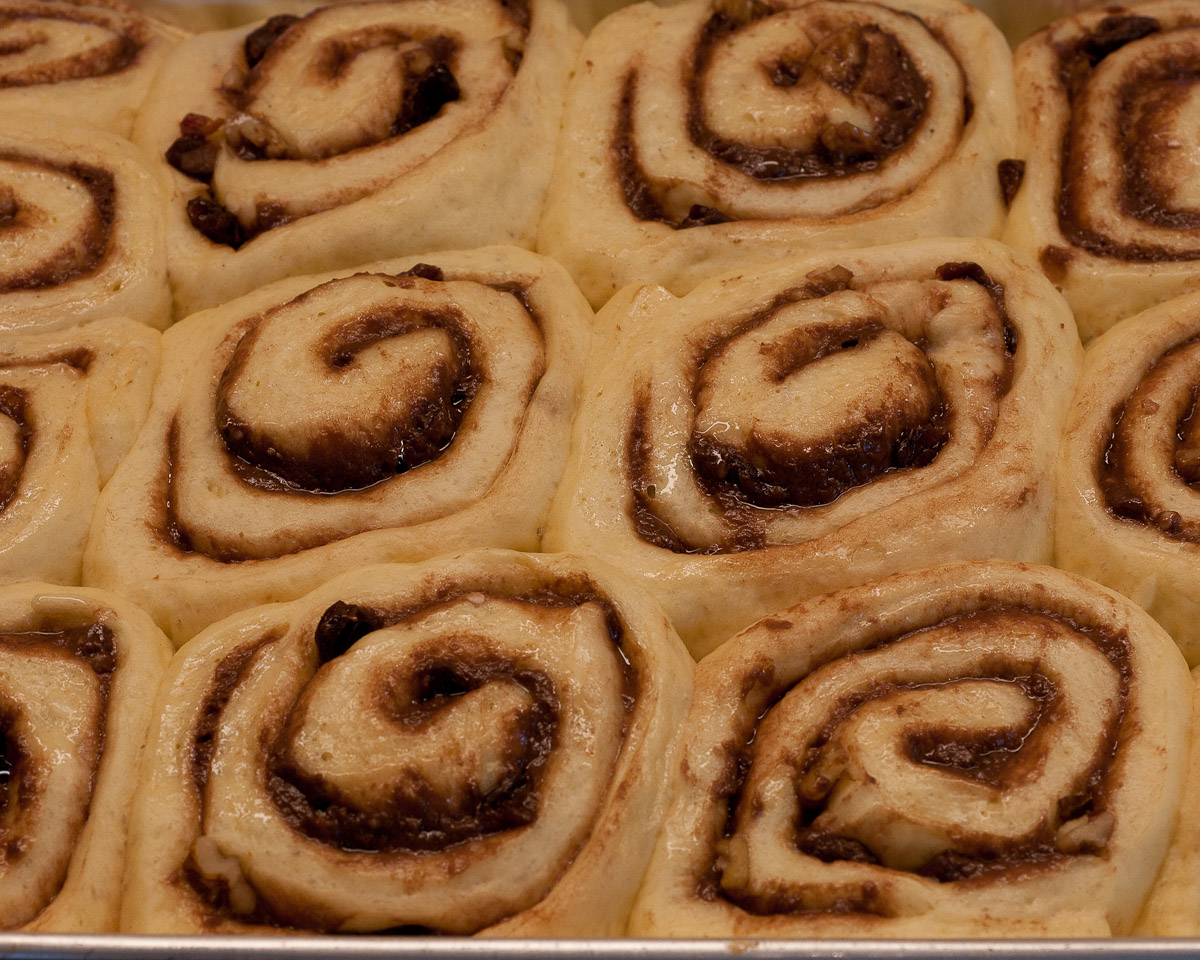
Challah Nutella Cherry Walnut Rolls


It was a busy weekend of night events, a few dinners with friends and a BBQ/Backyard concert on the Saturday.  Which then turned into a Sunday afternoon check in to make sure the host was feeling okay.  The days were quite clear so my plan was to bake and clean.  When it becomes summer and we go to the cottage a lot I need to be productive with my cleaning since the mess can build over a few weeks.

The sad thing about working during the day is the lack of time to make bread and well anything that uses yeast to rise, proof and double.  Unless I want to stay up until midnight, which is definitely not happening these days.  I generally have to wait until the weekend and queue up my bread making.  I hadn't made any bread in what feels like for ever so I figured this was the weekend to do it.

My original plan was to make regular cinnamon buns, but I got two mini packets of Nutella in the mail on Friday and that of course made me want to use Nutella. I then also wanted to make a challah bread so I figured why not put the two together.


Challah Nutella Cherry Walnut Rolls

INGREDIENTS:

  • 1 cup warm water (90-100F)
  • 1 1/2 tsp active dry yeast
  • 18 oz bread flour
  • 1 1/2 oz sugar
  • 1 tsp salt
  • 1 large egg + 2 egg yolks
  • 2 oz olive oil
  • 1 tbsp malt barley syrup or molasses
  • 2 tbsp milk
Filling
  • 6 oz cream cheese
  • 2/3 cup nutella 
  • 2 tbsp butter
  • 1/2 cup dried cherries, chopped
  • 1/3 cup chopped walnuts
Icing
  • 4 oz cream cheese
  • 1/2 cup icing sugar, sifted
  • 1 tbsp corn syrup
  • 1 tbsp heavy cream 
  • 1/4 cup milk 
  • 1 tbsp cocoa powder, sifted
INSTRUCTIONS: 

1) Combine water, yeast and a sprinkle of sugar in a measuring cup. Let the yeast bloom. It will bubble and you will smell it.


2) In a large bowl combine flour, sugar and salt and mix together.

3) In another bowl or large measuring cup combine eggs, olive oil and syrup and whisk together.

4) Make a well in the middle of the dry ingredients, add in water/yeast mixture and egg/oil mixture and gently bring together. When almost completely together, dump dough onto a lightly floured surface and bring together.


5) Knead the dough, folding it over itself. Do this for several minutes, the dough will be come smooth. Roll the dough into a ball, tightening it up, the dough should spring back when gently pressed. Place the dough in a lightly oiled bowl, cover with saran wrap and a cloth and let double in size (about 45-60 min).


6) Once dough as doubled punch down, form back into a ball, cover and let double again (about 45-60 min)


7) While the dough is on its second double combine cream cheese, nutella and butter in a small bowl and beat together. 

8) Roll out the dough into a large rectangle.  I was worried the dough would be too much so I cut off a   third and made a mini loaf. 

9) Using a offset spatula spread the cream cheese mixture over the dough.  Sprinkle the cherries and walnuts over top. 

10) From one of the long ends roll up the dough, trim off the edges and the dough into 12 even pieces. Spray a 9x13 pan with non-stick spray and place the 12 rolls into the pan, not touching,  they will double again.  Cover with saran and a dish towel and let double again (about an hour)


11) Once doubled,  Preheat the oven to 375F.  Brush the buns with milk and bake for 20-25 minutes until lightly golden on top.  Let cool slightly a few minutes in the pan and then double flip and place on a large cutting board.   


12) In a small bowl combine all icing ingredients and beat together until well combined.  Add the icing into a piping bag with a small circle tip and pipe over the buns.   You could just spread the icing on top as well.  

These are best eaten slightly warm so I recommend a little 20 sec microwave before eating if you are not eating them right from the oven.  I just love egg breads, they are just so rich and full of flavour.  I gave some to my Nutella obsessed friend and then brought the leftovers into work.  They were gone really quickly and I even got some looks that I didn't bring enough.

 MEG's RATING : D-EEEE-LICIOUS!  


Sunday, February 5, 2012

Nutella Nanaimo Bars


Superbowl and National Nutella Day all in one day.     This might be the biggest day of indulgence yet!
I am going out to a bar for the Superbowl.  Do I care who wins, not really.  I like football, but I don't watch it often.   I just randomly follow my team and pay attention if they do well.   Since my team is not in the Superbowl, it is just a fun evening out.   Today also happens to be the day before my Sister's birthday so it's a chance to spend the evening with her and some friends and family.

I was trying to think of a recipe I would make with Nutella, that at least I haven't seen before.    I have been flipping through my cookbooks for some random ideas of what could be spun to use Nutella. I was eyeing a peanut butter Nanaimo recipe for the last few months and thought how about Nutella instead of peanut butter?  Let's just see...

Nutella Nanaimo Bars
(Adapted from Anna Olson- Back to Baking)

INGREDIENTS:


Base

  • 2 cups chocolate cookie crumbs
  • 1/4 cup sugar
  • 1/3 cup cocoa powder, sifted
  • 1 cup sweetened shredded coconut
  • 1/2 cup unsalted butter, melted
  • 1 egg
  • 1 tsp pure vanilla extract

Filling
  • 3 tbsp unsalted butter, room temperature
  • 1 cup icing sugar, sifted
  • 1/2 cup Nutella
  • 1 tbsp heavy cream
  • 1 tsp pure vanilla extract

Topping
  • 5 oz dark chocolate (72%)
  • 2 tbsp unsalted butter

INSTRUCTIONS:
1) Preheat oven to 350F. Line a 8 inch square pan with parchment and spray with non-stick spray. 
2) Make the base : In a large bowl combine cookie crumbs, sugar, cocoa and coconut and mix together. 
3) Stir in the melted butter, egg and vanilla, mix all together until damp. 
4)  Press the crumbs flat into the prepared pan and bake for 15 minutes.    Let cool while preparing the filling.
5) Make the filling :  In a medium bowl , add butter and icing sugar and beat together to form a thick paste.  Add the Nutella, cream and vanilla and beat until smooth.    
6) Using an offset spatula spread the filling on to the crust.  Cover with plastic wrap, directly on the filling pressing flat and let chill until firm.  
7) When firm make the topping.   Melt chocolate and butter over a double boiler.   When completely melted let cool slightly and spread over the filling layer.    Chill again to completely set.   Slice in to bars and store in the refrigerator. 

Dreamy.    Next time I might add some finely chopped hazelnuts to the base and increase the Nutella layer to be a bit thicker, just to kick up the Nutella a bit more. 

P.S - How are Nutella and Nanaimo not considered words spelled correctly?

MEG's RATING : D-EEEE-LICIOUS


Wednesday, April 27, 2011

How to make homemade chocolate hazelnut spread a.k.a "Nutella"

This post is for my friend Sebastian.  A few weeks back  I made the Banana Nutella Whoopie Pies for him.  This came about after our trip to Roatan where he brought his own Nutella and made banana Nutella waffle sandwiches.   Clearly he is a die hard fan and always has a jar on hand.    I thought it would be nice to surprise him with a homemade jar of his very own.    With only a few ingredients and a food processor: rich, smooth and creamy Nutella is at your fingertips.

INGREDIENTS:
  • 200 grams hazelnuts
  • 140 grams milk chocolate, melted and cooled
  • 160 grams bittersweet/dark chocolate, melted and cooled
  • 1 cup 1% milk
  • 1/2 cup milk powder
  • 2 tbsp agava nectar
  • 1/2 cup confectioners sugar
  • 1/2 tsp pure vanilla extract


INSTRUCTIONS:
1) Preheat the oven to 350F.  Roast the hazelnuts in the oven for about 10-15min until fragrant.  Watch carefully so they do not burn.    Remove from the oven and rub with a dish towel or cloth to remove as much of the skins as possible.

2) Combine the milk, milk powder, agave nectar and vanilla in a saucepan. Whisking constantly, bring to a boil and remove from heat.
3) Place the toasted hazelnuts in a food processor and blend until a smooth paste is formed, as if you were trying to make peanut butter

4) Add the remaining ingredients and continue to blend until combined and smooth. 
5) Store in an airtight jar and enjoy.    If you want the mixture to be very smooth and remove some of the nutty texture you can run the mixture through a sieve before jarring.   I did not, I wanted to leave some of the texture in. 

I will tell you one thing I was quite happy that the recipe yielded a jar and a half as Sebastian might have had to pry this from my hands.  I really enjoy knowing the idea of homemade spreads are not far out of reach.    This recipe has a stronger hazelnut flavour than actual Nutella and was not quite as sweet.  It was still however, smooth, spreadable and delicious.

MEG's RATING: D-EEEE-LICIOUS


I received this picture from Sebastian a few days later.


Friday, March 4, 2011

I am whoopie for Nutella.

When I did my post last week on peanut butter sandwich cookies I was a bit shocked to find out that Nutella is not recognized as a word.   How sad.  Now I realize Nutella is just the name brand and if I were to write hazelnut spread the spell checker would have no problem understanding that, but who actually says hazelnut spread.  No one, its Nutella!  I took this as a sign that I need to blog more with it so it will get more hits and be recognized.   Nutella even has its own day, any food blogger knows that Feb 5th is World Nutella Day.   Since I was in the middle of a cake order and packing for my trip that week I wasn’t able to create something.   The funny thing is when I was on vacation in Roatan with my husband and some friends, we were at breakfast one day and our friend Sebastian shows up with his own jar of Nutella, smuggled in his suitcase.   What a lifesaver, those buffet waffles tasted so much better with Nutella and bananas sandwiched between them.   This gave me an idea! We were having a post vacation picture exchange on Friday night so I thought it would be nice to re-create some of those flavours.  I decided on Banana Whoopie Pies with Nutella cream cheese icing. 


(Pies adjusted from Martha Stewart)
INGREDIENTS:
  • 2 cups AP flour
  • 1/2 tsp baking powder
  • 1/2 tsp baking soda
  • 1/2 tsp salt
  • 1/2 tsp cinnamon
  • 2 medium mashed ripe banana
  • 1/4 cup sour cream
  • 1/4 cup greek yogurt
  • 8 tablespoons unsalted butter, softened
  • 1/2 cup granulated sugar
  • 1/2 cup packed brown sugar
  • 1 large egg
  • 1/2 tsp pure vanilla extract
Nutella Cream Cheese filling:
  • 8 oz cream cheese
  • 2 tbsp butter
  • 1/2 cup Nutella
  • 2 cups icing sugar
  • 1/2 tsp pure vanilla extract
INSTRUCTIONS:
1) Preheat oven to 350F.  Prepare some baking sheets with parchment or silpat.  In a medium bowl whisk together the first 5 dry ingredients.  Beat the butter and sugars in a bowl until smooth and well blended. Add the egg and vanilla and mix until incorporated. 
2) Mix together the bananas, sour cream and yogurt.  Add the dry ingredients to the butter/sugar mixture alternating with the banana mixture, ending with the flour.  Mix until just combined.
3) Add the batter into a piping bag fitted with a round tip or no top.   Pipe small mounds about 1 1/4 inch wide.  (These will spread)


4) Bake for about 12-15 minutes, until edges begin to brown.  Let cool on wire rack.  
5) Make the filling: Beat cream cheese and butter.  Add icing sugar and vanilla and beat until smooth and creamy. Add Nutella until combined  Adjust icing sugar amount to your desired stiffness and sweetness.
6) Put the filling into a small piping bag and pipe in a circle on one side of the cake.  Add another cake on top and gently press together.

After a couple tastes of the filling I wish I had added more Nutella to the icing so for a couple pies I spread some Nutella directly on to the cake and then added the filling.  That was a good decision, super rich and nutty.   Overall the best part about these was the icing.   Although I liked the banana cake, it wasn't great.   It may be that I have quite a love for banana bread and the texture and flavour of these cakes was just too different.   I also found the outside was just a bit too moist and could get sticky.    In summary: inside,  good but could have used more Nutella, outside, need to be tweak a banana bread recipe to be in mini cake form.    I will also make them smaller, the batter spread more than expected and they became 3 inch cakes instead of around 2.  (The 1 1/4 I state above should give you a smaller pie)    I also made one Whoopie Pie with out the Nutella for my nut allergic friend.

MEG's RATING : D-EEE-LICIOUS!


Sunday, February 20, 2011

Peanut Butter Sandwich Cookies

I was back and forth about what to bake this time around as I was having a huge craving for cream cheese icing and was leaning towards some red velvet cupcakes.   However I recently bought some more half price candy thanks to Valentines Day.  I picked up some Reese's cup hearts to only realize that I already have some mini cups from Christmas in my freezer.  What's the moral of this story? Check your freezer before you leave? NO,  You can never have enough peanut butter cups!  Red velvet cupcakes are on hold. Cookies are in.  I adapted this recipe from one of my many fine cooking cookie magazines.  I used their peanut butter cookie recipe but changed up the filling to include nutella to add a bit more of a chocolate kick.

INGREDIENTS:


Cookie 

  • 1 1/3 cups (6 oz) AP flour
  • 1/2 cup (2 oz) cake flour
  • 1/2 tsp baking soda
  • 1/4 tsp salt
  • 3/4 cup (6 oz) unsalted butter, soft at room temp
  • 3/4 cup peanut butter
  • 1/2 cup white sugar
  • 1/2 cup packed brown sugar
  • 1 tsp pure vanilla extract
  • 1 large egg
Filling
  • 1 1/2 cup icing sugar
  • 1/2 cup peanut butter
  • 1/4 cup nutella
  • 3 tbsp heavy cream
  • 2 tbsp skim milk
  • 3/4 cup chopped peanut butter cups
INSTRUCTIONS:
1) Heat oven to 350F.  Line baking sheets with parchment or silpat (preferred).   Sift together dry ingredients in a medium bowl.  In a stand mixer with a paddle attachment, cream butter, peanut butter and both sugars on medium untul light and fluffy.  Add vanilla and egg and beat until smooth.   Stir in flour mixture by hand until just incorporated.


2) Drop slightly heaping tablespoons on the baking sheets about 2 inches apart.   Flatten and round each drop into about a 2 inch round.  Bake the cookies until puffed and golden. about 12 minutes, rotating the baking sheets if needed.  (I didn't).   Transfer to a rack to cool. 
3) Make the filling : beat together the sugar, peanut butter and nutella.   It will be a bit crumbly.  Add cream and milk until smooth.  Stir in the chopped peanut butter cups by hand.   
4) Once the cookies are cool, flip some over and use an offset small spatula and spread 1 tbsp of filling onto each flipped cookie.  Set another cookie on top, gently pressing together. 
5) EAT!

I would have to say sandwich cookies are moving their way up to the top of my list of favorites.  You are getting the best of so many worlds, Cookies and a creamy filling.  I guess the Oreo people knew what they were doing. Although I will always choose homemade. It gives you the opportunity to make so many different variations.  The cookies were crunchy and the filling was nutty, creamy and rich.  When some people try and sneak back for seconds I know they are a keeper.  

MEG's RATING: D-EEEE-LICIOUS! 


Related Posts Plugin for WordPress, Blogger...