Image Map
Showing posts with label blueberry. Show all posts

Monday, May 27, 2013

Recipe Swap : Blueberry & Yogurt Parfait.

It is recipe sway day.  I’m so excited to be participating in an Old Fashioned Recipe Blog Swap!
Julie {White Lights on Wednesday}, Kelley {Miss Information} and Rachel {i love my disorganized life} have paired up 30 incredible bloggers to trade recipes on each others blogs for the day

.
Check out this great recipe below from a blogging friend and you can see my recipe on her site - Gluten Free Cinnamon Sugar Banana Doughnuts.


Hi! I'm Brianna from Flippin' Delicious where I blog gluten-free food and I am very excited to share this delicious, and healthy, parfait with all of you here at Sweet Twist of Blogging. This makes a yummy breakfast or quick snack that takes advantage of the berries that are just coming into season. I know it will be awhile before blueberries are really in season, but they are my favorite!


I have always loved blueberries! Blueberry bagels, blueberry muffins, blueberry cake doughnuts, blueberry crisp... blueberries are definitely my favorite berry. I even went through a phase right after I graduated from high-school where about once a month I would CRAVE blueberries and would run off to the kitchen to make myself a blueberry crisp (with chocolate in the crisp part.) As soon as it was cool enough to eat, I would eat the whole thing while studying! I can't do that anymore, but I this parfait satisfies my blueberry cravings quite nicely.


I can't eat any gluten, so I used Udi's Gluten-Free Sweet & Crunchy Vanilla Granola. You can use a different granola, if you prefer, but I really love this one. I also used Greek yogurt because I like that it is thicker and it is packed with protein. You could eat this as an afternoon snack, or even dessert, but I don't feel even a bit guilty eating this for breakfast!


Blueberry and Yogurt Parfait

Serves 1

INGREDIENTS:

For the Parfait:
Plain or Vanilla Greek Yogurt (I used about 1/2 cup but it will vary based on your parfait glass.)
Granola (1/4-1/2 cup)
1 recipe Blueberry Compote

For the Blueberry Compote:
1/2 cup fresh or frozen blueberries
1-2 Tbs. granulated sugar
1-2 Tbs. water

INSTRUCTIONS:

1. Make the compote by placing the blueberries, sugar, and water in a small saucepan and heating over medium heat until the sugar is dissolved and the juices are just barely thickened and a little syrupy (about 5 minutes.) Cool slightly before using.
2. In your chosen parfait glass layer a few Tbs. of yogurt, topped with a few Tbs. of blueberry compote, sprinkled with a few Tbs. of granola.
3. Repeat the layers 2-3 times and then enjoy!


Tuesday, October 4, 2011

1st Place Blueberry Brownies (Gluten Free)


It was a very exciting weekend.  On my way home from work after neglecting to pick up the mail for five days  I received a wonderful letter from the Canada Baking and Sweets Show.


I was over the moon.  My brownies made the finals.  There was one problem however, on Saturday I had a wedding to attend for Brad's cousin Jeff.  The wedding was at 2:30 in Barrie and somehow I had to be in Toronto at 2.  Toronto and Barrie are about an hour or so apart.   Let the frantic phone calling begin. I immediately called my sister and checked with another fellow baker to see if either of them could go and fill in my place.   My baker friend was out and my sister really wasn't that excited to go but I begged and pleaded.  She managed to find a friend that would go with her and keep her company,  so she agreed to go.  Phew.

Saturday morning I wake up, get my hair done and then get ready to for the Wedding. We get picked up around 12:30 to head up to Barrie.   The wedding was outside at a golf course, there was a cool breeze but the sun was out so it wasn't too bad. A beautiful fall day.   I sat there keeping one eye on the ceremony  and one eye on my cell phone,  that was peaking out of my little silver handbag.  I was anxiously waiting for a text message from my sister on the status of the competition.    There were 10 categories in the home baking category so neither of us were quite sure when the brownie judging would begin.

2:54pm - "They are eating your brownies"
3:00pm - "OMG you won!!" 
3:01pm - "Shut up!"
3:03pm - "Serious! Heather from Cupcake Girls was a judge"
3:04pm - "Yippee"

Keep in mind while all this was going on, our cousins were saying their I do's, so my outside voice excitement was mute.   Mute until they walked backed down that aisle, the bar opened and the celebrations could begin.   I was very excited, all my blogging and baking hard work over the last several years has paid off.  The winner of each category got their name in the paper and the following basket of goodies:


Not sure what I will do with the mixer since I already have one, but a girl can always use more than one, can't she??

Here is my winning recipe.  It's been pieced together and adjusted from a combination of recipes.

Blueberry White Chocolate Chip Brownies (Gluten Free)


INGREDIENTS:

  • 175g unsalted butter
  • 175g dark chocolate, good quality
  • 3 large eggs
  • 1 tsp pure vanilla extract
  • 200 grams granulated sugar
  • 1/2 tsp salt
  • 100 grams chopped blueberries
  • 75 grams white chocolate chips
  • 110 grams brown rice flour
  • 15 grams cornstarch

INSTRUCTIONS:

1) Melt butter and chocolate on low in a medium saucepan or double boiler (if you are afraid to burn it).  Stir until smooth, remove from heat to cool slightly.


2) Line a 9 inch square pan with parchment or foil, folding over two sides so it can be lifted out. Spray with non stick spray.
3) Beat eggs, sugar, salt and vanilla together in a large bowl. Add cooled chocolate mixture to egg/sugar mixture and beat to combine. 


4) Fold in flour, cornstarch, blueberries and white chocolate chips.


5) Pour batter into pan and bake at 350F for 23-25 minutes.  Let brownies cool in pan for 10 minutes, then remove lifting up the sides of foil/parchment.  Let cool completely before slicing.

I wouldn't have submitted these to the competition if I didn't think these were awesome brownies.  Moist, fudgy and chocolaty.  It also has blueberries so it's healthy. HA, wink wink.

MEG's RATING : D-EEEEEE-LICIOUS


brownies,blueberries, white chocolate, best, winning, gluten free


Tuesday, August 23, 2011

Peach Blueberry Crumble Inside Pie

I know I already did a peach tart this month but it's so hard not to utilize all the wonderful peaches in season.   They just stare at you at the markets and groceries stores in their cute little baskets.  Buy me, I'm Juicy, they are secretly telling me.   Since my focus this month is pies,  I figure there is no harm in attempting to do another one.  This pie however I will  give to my Dad, who is a big peach fan. He also happens to be a crumble fan. I wanted to actually give this pie a dough lid, so to speak,  but still give Dad a hint of crumble.  I decided to sneak some crumble on the inside of this pie.   The recipe was adapted from the Food Network Canada August Cooking Club Challenge.  Here is my version with a few sweet twists.


INGREDIENTS:

Dough

  • 2 cups unbleached all purpose flour
  • 1/4 teaspoon salt
  • 2/3 cup unsalted butter, cut into pieces and chilled
  • 1/3 cup lard, cut into pieces and chilled
  • 3 tablespoons cold water
  • 1 tablespoon vodka
Filling

  • 8 peaches, peeled and sliced
  • 1 cup blueberries
  • 1/4 cup granulated sugar
  • 3 tablespoons unbleached all purpose flour
  • 1 teaspoon lemon juice
  • 1 tsp cinnamon
  • 1/4 tsp nutmeg
  • 1/2 cup oats
  • 1/4 cup brown sugar
  • 1/4 cup unbleached all purpose flour (for crumble)
  • 1/4 cup unsalted butter, slightly softened
  • 1 egg, mixed with 2 tbsp cold water, for brushing

INSTRUCTIONS:
1) Make the dough: Combine flour and salt. Cut in butter until the texture of coarse meal.


2) Mix together water and vodka and add to flour. Using a wooden spoon and then your hands (trying not to warm the dough too much) blend until dough just comes together. Shape dough into a disc and chill for at least 30 minutes.
3) Preheat oven to 350 F.  Divide dough in half. On a lightly floured surface, roll out 1 piece of dough to 1/4-inch thick. Line a 9-inch pie pan with pastry.  Trim the hanging edges with a small knife.  Chill dough while preparing filling.


4) Make the filling: Toss peaches and blueberries with granulated sugar, 3 tbsp flour, lemon juice, 1/2 tsp cinnamon and nutmeg.


5) Make the inside crumble : Combine oats, brown sugar, 1/4 cup flour and cinnamon.  Add butter, combing and moistening the mixture with your hands.  Mixture will darken as it moistens.
6) Combine crumble mixture with peach mixture.  Spoon this mixture into pie pan.
7) Roll out second piece of dough to 1/4-inch thickness. Cut out your desired shapes or pattern using cookie/fondant cutters.  If you don't want a shape, do at least 3 small holes to allow air out.
8) Carefully roll up the crust and gently unroll over the peaches - trying to get the pattern over the center.   Trim off the excess dough and crimp together the edges with a fork. Brush pie with egg wash


9) Bake for 50-55 minutes on a baking sheet (to catch drips) until golden brown.  Set on a wire rack for 10 minutes to cool slightly.  Serve warm or at room temperature


The good thing about being a food blogger is the requirement for some nice photos which requires me to cut the pie and take a slice out.   That is also another bonus of baking a pie for your Dad, he won't really mind if there is a small piece missing.   I like to think of it as quality control.

This pie was super.  The inside crumble wasn't crunchy, obviously since it was hidden under the pie crust.  It did however give the pie a nice nutty, brown sugar sweet flavour, which I rather enjoyed.

MEG's RATING: D-EEEE-LICIOUS
DAD's RATING : SAME

peach, blueberry, pie, crumble, food network


Saturday, August 6, 2011

Peach and Berry Tart


 The month of pies/tarts continues.... We were off to the cottage for the August long weekend and in a fantastic coincidence it is also peach season.  I browsed through my Martha Stewart Pies/Tarts book and wouldn't you know it, there are two recipes calling for peaches.  One was mini peach tarts using puff pastry, the other was a peach and berry tart with a flour cornmeal crust.   I choose the later, a flour cornmeal crust, how intriguing!  Both the filling and crust looked quite simple to put together and that is always a big plus when life makes you short on time and when the weather makes you not want to bake.   Here is pie #2 for the month


INGREDIENTS:

Crust
  • 3/4 cup unbleached all purpose flour
  • 1/2 cup yellow cornmeal (preferred stone ground but that is not what I used)
  • 3 tbsp granulated sugar
  • 1/4 tsp salt
  • 1/3 cup + 1 tbsp unsalted butter, cut in to small cubes
  • 1 large egg yolk
  • 1/2 tsp pure vanilla extract
Filling
  • 3-4 small/medium sized peaches, sliced into wedges
  • 3/4 cup assorted fresh berries
  • 1/4 cup brown sugar

INSTRUCTIONS:

1) Make the crust: Preheat oven to 400F.  Add all crust ingredients into a food processor and pulse until dough just begins to come together.


 2) Press the dough into the bottom of a 9 inch tart pan and up the sides.  Bake until golden and slightly puffy, about 15 minutes.   Remove from the oven and press the center of the crust gently with an offset spatula. 
3) Make the filling : While the crust is baking combine the filling ingredients in a medium bowl and toss together.


4) When the crust is complete, reduce the oven to 375F.   Arrange the fruit on top of the crust.  Bake until peaches are tender and lightly golden, about 30 minutes.  Let cool on a wire rack.  Serve warm or at room temperature. 


This crust was so interesting.  I can understand why the recipe preferred stone ground cornmeal but I rather enjoyed the texture it had with the slightly coarser cornmeal.  The cornmeal also gave a nice flavour
I actually accidentily overbaked this, recovered the berries with some new ones and this still turned out pretty great.  It was a easy as it looked and the crust was easy to handle.  


MEG's RATING: D-EEEE-LICIOUS!


Friday, July 22, 2011

Blueberry Banana Bread - Fail and Recover


There is a reason many chefs prefer to be savoury chefs and not bakers or pastry chefs : the inability to taste.  When you are preparing a stir-fry or pasta you can taste the sauce, add a little salt as needed and you are good to go.   When baking most breads or cakes you don't really know if they turn out well until you get to slice or cut into it and dive in.   Wouldn't that be a shame if you had baked a beautiful blueberry banana bread and bring it up to the cottage to only slice it, bite and discover something isn't quite right.  How on earth could I forget the sugar!! Yep, blog fail.  The interesting thing was the bread looked absolutely perfect, soft and moist and loaded with blueberries.  The taste,  however of the no sugar bread was the complete opposite - terrible.   My obvious advice, don't forget the sugar in recipes when it calls for some.   I guess that is the beauty of blogging you can easily trace your steps through photography and figure out what was missing.   I did want to know if this recipe was actually any good so I re-baked it. 
Adapted from The Sweeter Side of Amy's Bread
INGREDIENTS:
Do these look ripe to you?
  • 2 cups  All purpose flour
  • 1/2 cup granulated sugar
  • 1/2 tbsp baking powder
  • 1 tsp salt
  • 1/4 tsp baking soda
  • 2 large eggs
  • 1/2 cup vegetable oil
  • 2/3 cup milk 
  • 1 cup oats
  • 2 cups (3-4) ripe mashed bananas
  • 1 cup blueberries

INSTRUCTIONS:
1) Preheat the oven to 375F.  Grease/Spray a 9x13 loaf pan. 
2) Combine the oats and 1/2 cup of milk in a small bowl and let soak for 5 minutes
3) In a medium bowl whisk together the eggs, oil and remaining milk.
4) In a larger bowl combine the first five ingredients and whisk together.   Make a small well. 
5) Pour the wet mixture into the dry ingredients and fold together until partially moistened. Add the oats and bananas and fold together until almost combined.  


6) Add the blueberries and fold a few more times until all ingredients are just moistened. 
7) Place the mixture into the prepared loaf pan.   Bake for 10 minutes at 375F and then reduce to 350F and bake for another 40-45 minutes. A toothpick should come out clean. 


8) Remove from the oven and let the loaf cool for 10 minutes, then turn out on a wire rack to cool further.    Eat right away or wrap tightly in plastic wrap or ziploc bag and store in the fridge for up to 5 days.

The version with sugar is much better.  LOL!  I re-baked it for a girls bachorlette weekend away and it was the perfect breakfast accompaniment.  Moist and delicious with loads of blueberries. 

MEG's RATING : D-EEEE-LICIOUS!


Saturday, July 9, 2011

Three Berry and Rhubarb Crumble Bars. A Summer MUST!!

What to do with the remaining rhubarb sitting in my freezer?  I wanted to use it to go along with the brownies and cupcakes I made for the bridal shower. My friend, Kelly who was wonderful enough to give me the Rhubarb was hosting the shower, so I thought it would be great to bring a dessert that showcased some of the fresh fruit growing right in her backyard.


Mixed Fruit Crumble Bars

INGREDIENTS:

Fruit Filling

  • 4 cups fresh berries or rhubarb (fresh or frozen), cut into small 1/2 inch pieces.
  • 1 tablespoon lemon juice
  • 1/3 cup sugar
  • 2 tablespoons cornstarch

Crust

  • 1 cup all-purpose flour
  • 1/2 cup whole wheat flour
  • 1 1/2 cups uncooked quick-cooking oats
  • 3/4 cup firmly packed brown sugar
  • 3/4 cup butter, softened
  • 1/2 teaspoon baking soda
  • 1/4 teaspoon salt

INSTRUCTIONS:

1) Combine fruit and lemon juice in a medium saucepan. Cook over medium heat, stirring occasionally, until fruit is tender about 12-15 minutes.


2)  Combine the granulated sugar and cornstarch in small bowl. Stir into fruit mixture. Continue stirring until mixture comes to a boil.  Continue boiling until thickened about 1-2 minutes. Remove from heat. Set aside, it will continue to thicken as it sits and cools.

3) Preheat oven to 350°F. Combine all crust ingredients in large or mixer bowl. Beat at low speed until mixture resembles coarse crumbs. Scrape down if needed so that all mixture is crumbly.


4) Reserve 1 1/2 cups crumb mixture. Press remaining crumb mixture onto bottom of greased 10-inch square baking pan lined with foil.  Spread filling over crust. Sprinkle with reserved crumb mixture.
5)  Bake for 30 to 35 minutes or until golden brown.   Let cool completely before removing so that fruit is set.  Cut into squares. 


I sadly have no "hero" shot for theses.   Most of them went to the bridal shower and the remaining went into to work and I simply forgot. It is a shame to because the word needs to be spread on how fantastic these bars are.   I am not sure if it was my choice of berries ( I used one cup of blueberries, strawberries, blackberries and rhubarb)  that gave a sweet and tart flavour or maybe it was the crunchy crumble base but I love loved these!  Yes, it deserved two loves.

I was almost tempted to make them again just so I could take a proper photo, or really because I wanted to eat another batch.   I, however did not.    Spread the word on these bars people, they are summer berry crunchy heaven.

MEG's RATING : D-EEEEE-LICIOUS!

rhubarb, strawberry, blueberries, blackberry, crumb, bar, best fruit, oats


Monday, May 23, 2011

It's time for pie!


As spring and summer approaches the first thing that comes to mind is fruit, fresh, ripe and sweet berries. Drool.  I love berries of any kind, strawberries, raspberries, blueberries, blackberries. I just can't get enough.  They are so bright, colourful and sweet, not to mention packed with tons of nutrients, vitamins and antioxidants.  One of my stranded island foods would be yogurt and berries.  I eat it almost every day.
One of the sweetest ways to enjoy fruit is pie.  Wonderful fruit combination nestled in between a flaky buttery crust.
I first saw this recipe on Diners, Drive in and Dives and though it was so interesting.   There are so many fantastic recipes, people and places on that show I just had to try one of them.


Blueberry Goat Cheese Pie
(adapted from Food Network)

INGREDIENTS:


Crust:
  • 2 cups unbleached all-purpose flour
  • 3/4 cup (97 grams) cold lard, 1/2 inch cubes
  • 1/2 cup (68 grams) butter, cold, 1/2 inch cubes
  • 1 tablespoon sugar
  • Pinch salt
  • 4-6 tbsp ice water
  • 1 egg - for the egg wash


Filling:

  • 1/2 cup soft cranberry goat cheese
  • 1/2 cup half and half ( 10% cream)
  • 1 large egg
  • 1/2 cup brown sugar
  • 1/4 cup all-purpose flour
  • Pinch salt
  • 4 cups fresh blueberries


INSTRUCTIONS:

1) Make the crust:  Combine the flour, salt and sugar in a food processor or large bowl if you don't have one.   If using a food processor add the lard and run until the mixture resembles a course sand.  If you are not using a food processor cut in with a pastry blender.


2) Add the butter cubes and pulse about 10 times until butter is about pea sized.  Or use your pastry blender to cut in the butter into small pea sized shapes.


3) Remove the mixture from the processor and place into a large bowl.  Add 4 tablespoons of the water pressing into the dough using a spatula or your hand to combine to bring the dough together, being careful not to melt the chunks of butter.  Add the remaining water if needed.


4) Separate the dough about 60-40.  Flatten into 1 inch disk and wrap in saran wrap.  Let cool a minimum 1 hour or overnight.


5) When you are ready, remove the dough from the fridge and make the filling: Mix the goat cheese, cream, egg, sugar, flour, salt and blueberries together in a bowl until everything is incorporated together. Set aside.


6) Unwrap the dough and lightly flour a clean dry surface and your rolling pin.   Roll out the dough into a circle to fill a 9 inch pie tin.   Place the dough into the pie tin.   To avoid tearing the dough roll it back over the rolling pin and unwind over the pie tin.   Cut off any loose edges and poke the shell with a fork on the bottom a few times.


7) Add the blueberry mixture on to the pie shell.
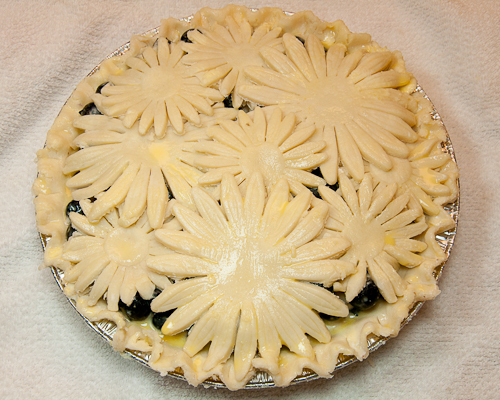
8)  Roll out the remaining dough.    You can roll out another circle and place it on top or grab your favourite flower/cookie cutter and cut out shapes to cover the top of the pie.   I like daises, as shown.


9) Combine an egg and 3 tbsp of water.  Using a pastry brush, brush the top crust of the pie.  Bake for for 15 minutes at 425F and reduce hit to 375F baking another 40 minutes until top is golden and filling is set.


Isn't pie crust so much prettier this way?  When you first think of adding goat cheese to a pie it might seem a it odd but this pie was great.   Goat cheese is tangy and creamy and it balances well with the acid and sweetness from the blueberries.  The egg, cream and cheese hold the pie together almost like a custard pie would.   This was a perfect pie to kick off the warm weather.

MEG's RATING: D-EEEE-LICIOUS


Pi Day Pie Party

Related Posts Plugin for WordPress, Blogger...