Image Map
Showing posts with label coconut. Show all posts

Tuesday, March 25, 2014

Coconut Cream Mini Pies with a Lemon Oreo Crust + a Reveal!


I mentioned last week one of my favorite things about finding about the sex of the baby is to make reveal desserts to tell people.   It is a lot more fun to have people bite into something and find out rather than just telling them.  It also drives them nuts that you make them wait until they see you to get a dessert.  My goal every time is to try and come up with different ways to tell people though instead of the traditional cake or cupcake.  My mind begins to spin on what sort of treat can I sneak a pink or blue center into.

I had a few ideas in my head which you will see in the next post or two but this one was my last minute idea that popped into my head thanks to Pi Day.  If you saw my last post - White Chocolate Peanut Butter Pies - I was part of a group of bloggers who got together to celebrate Pi day.  One of the pies in the collection was a Coconut Cream Pie from Rachel @ I love my disorganized life.   This gave me an idea, why not sneak in something pink or blue at the bottom of a little tart and then top it with the coconut filling.   Perfect.

I couldn't use Rachel's recipe exactly because the eggs are not cooked and knowing I would like to eat it myself I wanted to make sure they were heated so I used a slightly different method.  I also was dying to use up some lemon oreos sitting in my cupboard and lemon and coconut is such a great combination I had to try mixing them in somehow.

Coconut Cream Mini Pies with a Lemon Oreo Crust


INGREDIENTS:

  • 10-12 Lemon oreos
  • 3/4 sleeve of graham crackers
  • 2 tbsp corn syrup
  • 2/3 cup butter
Filling
  • 1 cup unsweetened coconut
  • 1/2 cup boiling water
  • 1/4 cup granulated sugar
  • 3 tbsp cornstarch
  • 3 tbsp all purpose flour
  • 2 egg yolks
  • 1/2 tsp salt
  • 1 1/2 cup 2% milk
  • Pink and Blue sprinkles (more of what you need to reveal)
INSTRUCTIONS:
1. Preheat the oven to 350F. 
2.In a small sauce pan , melt together the butter and corn syrup on med-low.  Set aside. 
2. In a food processor, blend lemon oreos and graham crackers until processed and fine with no chunks remaining.
3.  Mix together wet and dry mixture until crumbs are all moistened.  Divide evenly between 12 muffin cups, lightly greased or using silicone molds.  Press to shape into cups.   Bake for 8-10 minutes, remove from oven and press down any puffing with the back of a spoon.
4.  While the cups are baking,  put the coconut into a small bowl and cover with the boiling water.  Let stand. 
5. In another bowl combine sugar, cornstarch, flour, salt and egg yolks, whisk together. 
6. In a medium sauce pan heat milk just to a boil.  Remove from heat and slowly whisk in some of the milk to the egg mixture, whisking constantly as you pour.   Slowly whisk in about half to two thirds of the milk. 
Pour the combined mixture back into the sauce pan with the remaining milk and return to medium heat,  whisking constantly until mixture begins to thicken.  Remove from heat and continue to whisk out any lumps. 
7.  Stir in coconut, cover with saran wrap and let cool in the refrigerator.  
8.  Remove the shells from the pan or silicone molds.  Place a teaspoon of pink or blue sprinkles in the center of the pie shell, cover with a large scoop of the coconut filling.  Top with a few more mixed sprinkles, store in the refrigerator until ready to eat. 


P.S.   IT'S A GIRL!!  My husband is feeling quite out numbered now with a 3:1 ratio but he will survive, as long as he knows who's boss.  hehe


Tuesday, December 17, 2013

Salted Caramel Macaroons


Oh right,  I am food blogger.  I am supposed to be bringing you delicious desserts a lot more often than I have been.   Weekends away, Christmas parties, shopping, a sick little one etc etc have seem to gotten in the way.

These cookies were actually meant for a neighbour in exchange for a favor while we were away for a few days.  Unfortunately he never got the message from his son and never got the cookies.  Instead they were were sent to my husbands work for a potluck party.  Still well enjoyed.

I stopped into my work this past week to discuss my return post mat leave.  While there they happened to mention that there has been a significant decline in work treats since I left.   They seem pretty excited to have me back.  Not sure if it is for the treats or for my work but I suspect they are hoping for a new increase in desserts.   I don't mind, bringing treats into work means less I eat and more experimenting.   *Sneaky, Sneaky*

Tuesday, October 22, 2013

Almond Joy Cheesecakes


This past weekend I made 120 cupcakes and a mini 6 inch cake for a wedding, and two weeks ago I made a 3 tier lemon coconut cake for a wedding.  So October has been busy.  My next cake with be for my little ones FIRST birthday. What? First birthday already! Where did this year go?  I cannot believe in it less than a month it will be here.  I have sent out the invites but now I need to start planning decorations, food, loot bags.. am I missing anything?

Sunday, June 23, 2013

Funfetti Butterscotch Nanaimo Bars


Okay so I am a little behind again.  No good excuse other than busy with life.  A couple days of pampering myself with a manicure/pedicure and a well needed massage, enjoying the beautiful weather and spending time with family and friends have all played a factor.  Now that summer is in full swing life gets pretty busy.  This weekend we had back to back events both Saturday and Sunday.  With the black flies all dead and good weather here to stay the Cottage will be taking up several weekends in the near future.

The little one is also getting mobile as we entertain the backwards crawl/slide right now.   Time to get the baby gates up and be on guard.   She is 7 months now and in such a great phase. Responsive and fun.  Peek a boo is just hilarious,  I think almost more for me as I cry with laughter from her reaction and laugh.  We have no teeth yet so I am enjoying that before the pain comes in.  I imagine any day now but I think we have been saying that for months.

With lots of gatherings come lots of great snacks. These Nanaimo Bars are a Canadian classic and I love them.   When you love something it is always fun to spin them as much as possible to create fun variations. These turned out to be a great twist.

Funfetti Butterscotch Nanaimo Bars

INGREDIENTS:

Base

  • 1 1/3 cup graham crackers
  • 2/3 cup coconut (half sweetened/half unsweetened)
  • 1/4 cup cocoa
  • 1/4 cup granulated sugar
  • 1/3 cup walnuts, finely chopped
  • 1/2 cup unsalted butter
  • 1 egg
Filling
  • 2 cup confectioners sugar
  • 1/2 cup unsalted butter
  • 2 tbsp butterscotch pudding powder
  • 1 tsp pure vanilla extract
  • 3 tbsp 10% cream
  • 1/2 cup sprinkles
Topping
  • 1 cup chocolate chips
  • 2 tbsp unsalted butter

INSTRUCTIONS:

1) Preheat the oven to 350F.
2) Make the base : Combine graham crackers, coconut, cocoa, sugar and walnuts in a large bowl.
Add butter and egg and mix all together.  Press into a 10 inch square pan.   Bake for 10-12 minutes.
3) Make the middle : In a large bowl or mixer bowl beat butter until smooth.  Add butterscotch powder and vanilla extract.  Mix together.
4) Slowly beat in confectioners sugar until well combined and smooth.  Add cream, beat all together.  Mixture should be creamy and smooth but not too soft.  Stir in sprinkles.
5) Place in the fridge to set.
6) In a small sauce pot melt chocolate chips and butter together.  Spread over the icing mixture.  Let set.


Monday, April 29, 2013

German Chocolate Meringue Cake


Seriously who is excited Spring is here and the warmer weather is here with it.  I am so happy I can do the daily walks with my little one and soon head off to the cottage on the weekends.
With the warm weather comes gardening and lawn care.   I am not a huge fan of either.  I love when my garden and planters look pretty but I hate the maintenance of it.  Does anyone like weeding though?   No.

We have this huge bush in our front garden that grows like crazy and by then end of the summer it is taking over our front walk way.   At the beginning of every spring, I prune it down in hopes it doesn't take over because I honestly never prune it in the middle of summer.  This year however, I may have gone a little over board.   The hubby was not too happy when he saw the cut job I did on this bush.   Oops.   I know it will grow back, we may just have a few weeks of ugly before that happens.  Most of our neighbours have pretty nice lawns and no matter how much we try and take care of ours or hire some one to do it, it just isn't quite great.

I am crossing my fingers 2014 will involve some major renos on the front and back yard.  Until then I will suffer with a mediocre looking lawn and garden.   Maybe I can bribe my neighbours with this cake to look after it for me.

Wednesday, February 27, 2013

Irish Cream Magic Bars


I am going to keep this post short and sweet.   I leave for Florida tonight.  Well we leave to go to Buffalo to then fly out tomorrow morning so there is much to do to get ready.   Our first trip with the little one,  so I am making sure I have enough but not too much.  Shocking how much I can bring for 3.5 month old.  Her stuff is over flowing into my suitcase. I am exhausted already. Alas,  I am really looking forward to getting out of this slush and into some warm sunny weather.  The LO will get some  quality time with Grandma and Grandpa and I will get a tan.

Since St. Patricks day is coming and I will miss 6 days of baking I am getting you a dessert early.   When its St. Paddy's day you bake with Irish cream and make it green and that is exactly what I did.

Enjoy.

Sunday, November 25, 2012

Hawaiian Wedding Cookies and my new LOVE.

Okay, so yes I have been MIA for over the last two weeks. How can I not post after I told you I had been baking up a storm.  I also have a half written post about Online Blogcon and some serious pinning to tell you about.  Since last Friday though I have barely picked up my computer, had the time to or wanted to.  On Saturday November 17 a new love arrived in my life, quicker than ever expected and in the unplanned privacy of her own home.  Thanks to 3 amazing midwives and my hubby who got me through it all.  So, instead of staring at my computer for hours this new love occupies all my time.  She is perfect, lovely and so much easier to cuddle with than my laptop.   Her name is Samantha.


Alright, I guess I can't stare at her all day she does need to sleep and I need to maintain some level of productivity.  In my last post (which feels like ages ago) I did mention I baked a lot of cookies.  Cookies I planned to put out for the guests that would be stopping by.  Of course I mostly forgot to put these cookies out for most people but somehow they still got eaten.  


Hawaiian Wedding Cookies
(adapted from Cuisine at Home - Holiday Cookies)

INGREDIENTS:
  • 1/2 cup unsalted butter, softened
  • 1/2 cup confectioners sugar
  • 1/2 tsp salt
  • zest from 1/2 lime
  • 1 cup unbleached all purpose flour
  • 1/2 cup macadamia nuts, finely chopped
  • 1/2 cup blended sweetened and unsweetened coconut, toasted
  • juice from 1/2 lime
  • 1/2 tsp pure vanilla extract
  • confectioners sugar for dusting. 

INSTRUCTIONS:

1) Preheat oven to 350F.  Line a baking sheet with parchment paper or silpat.
2) In a large bowl mix together butter, sugar, salt and lime zest until well combined with a spatula or wooden spoon.  You can also use a mixer.
3) Add nuts, coconut, flour, lime juice and vanilla and mix with a spoon until incorporated.
4) Shape the dough into round balls using a small cookie scoop.  Bake about 15-18 minutes, bottoms will be golden.    Let cool on pan a few minutes.
5) While the cookies are still warm, roll in the confectioners sugar or simply dust using a sifter.   Let them cool completely and dust again.   Store in airtight containers, can also be frozen for a month.

These cookies are actually supposed to remain more round but I put the freshly toasted coconut onto the mix which melted the butter hence flattening the cookie.   I suggest making sure the coconut has cooled if you want the more rounded ball look to your cookie.

MEG's RATING : D-EEEEE-LICIOUS!


Monday, May 28, 2012

Chocolate Chip Cookies with Toffee Bits and Coconut


Sometimes you just crave the classics.  I find every few months I just want some homemade chocolate chip cookies.   I always know they won't last long no matter where I bring them.  Chocolate chip cookies are just like a clean house. Cleaning weekends are tiring but I just love when my house is in tip top shape.  Just like chocolate chip cookies it may not always last long but it makes me happy.  The weekend wasn't all cleaning and organizing though, we had two sets of dinner with friends and Saturday I went to see a movie with my sister and her friend.  I also worked on and delivered the picture below on Saturday.   One of my new favorites, ribbon just makes cakes look so simply and elegant.


Is anyone a fan of musicals or plays?  Tonight my sister and I are taking my mom to see "Young Frankenstein".  The funny thing is I have no idea what it is about.   It is a old movie/musical that my mom loves.   I sort of like not knowing though.  I have gone to several plays based on movies and come out disappointed in how they change the story.  The singing and acting may be great but please don't change the story of a classic.   I will keep you posted on how it goes.

Chocolate Chip Cookies with Toffee Bits and Coconut
(adapted from Cooks Illustrated)

INGREDIENTS: 

  • 2 cups all purpose flour 
  • 1/2 tsp salt
  • 1/2 tsp baking soda
  • 6 oz unsalted butter, melted and cooled slightly
  • 1 cup brown sugar (7 oz)
  • 1/3 cup granulated sugar
  • 1 large egg
  • 1 large egg yolk
  • 2 tsp vanilla extract
  • 1 cup chocolate chips
  • 1/2 cup toffee bits
  • 1/2 cup unsweetened shredded coconut

INSTRUCTIONS: 
1) Heat oven to 325F. Mix dry ingredients in a medium bowl and set aside
2) In a large bowl or your mixer bowl beat together sugars and butter until thoroughly blended.   Beat in egg, egg yolk and vanilla.


3)  Add dry ingredients and mix until just combined.  Add chips/bits/coconut and blend on low until just combined.  I choose to cover the dough with saran wrap and refrigerate for 24 hours.


3) If you chill the dough, allow dough to warm up a little so it is somewhat scoopable. I would scoop and then remove excess.  Using a small-medium scoop, place rounds on a parchment or silpat lined baking sheet.  Flatten slightly. Bake the cookies, about 12-15 min or until edges become golden.  Depends on how soft you  like them. Cool cookies on cookie sheet and store in air tight container.


You really can't go wrong with any variation of this recipe I discover.  You can add almost anything you like and it would still taste good.

Check out Kitchen Bootcamp for lots more cookies and bars this month.


MEG's RATING : D-EEEEE-LICIOUS!!


Wednesday, March 28, 2012

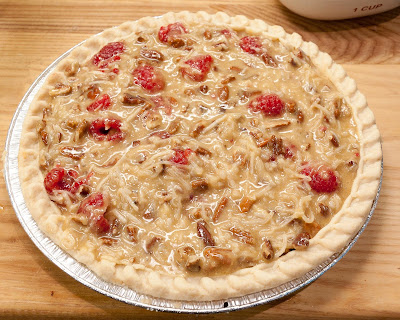
Raspberry Pecan Coconut Pie


So I have been slacking on the blog front lately.  Slacking on all fronts really.   I feel like I haven't baked in weeks.  Although I did make 3 Coconut Salted Caramel Chocolate Pies for a lady at work, I haven't baked anything new.  I think I have thrown myself into pre-vacation mode where I don't really want to do anything.  I also seem to also be choosing to venture outside and enjoying this wonderful weather we have been having (off and on).   I have also spent barely any time on twitter, pinterest or blog reading.  I am now trying to catch up on days worth of my dashboard, bloglovin et all to find out what I have missed over the last week. Uggh..so behind.

Since my plans for excessive mini egg baking have gone out the window with my trip I wanted to give you an awesome Easter pie.  

Raspberry Pecan Coconut Pie
(adapted from Anna Olson)


INGREDIENTS:

  • 1 homemade or premade pie crust
  • 2 eggs + 1 egg yolk
  • 3/4 cup brown sugar
  • 1 tsp pure vanilla extract
  • 1/2 cup unbleached all purpose flour
  • 1/2 tsp baking powder
  • 1/4 tsp salt
  • 1 1/2 cups pecan peices
  • 1/2 cup unsweetened coconut
  • 1/2 cup sweetened coconut
  • 1 cup fresh raspberries

INSTRUCTIONS:
1) Bake the pie crust as per blind bake instructions.  Let cool and place the pie crust on a baking tray. 
2) Preheat oven to 325F. Combine eggs, brown sugar and vanilla in a large bowl. Mix together well. 


3) Add flour, baking powder, salt, coconut and pecans


4) Fold in raspberries.  Pour the mixture into the crust. 


5) Bake for 45 minutes, until evenly browned and set.   Allow tart to cool completely.   Store in the fridge up to 4 days.


This is a  great combination of ingredients.  It's like a pecan pie with coconut and raspberries.   The raspberries just make this so nice and fresh for the spring.

MEG's RATING: D-EEEEE-LICIOUS


Sunday, March 11, 2012

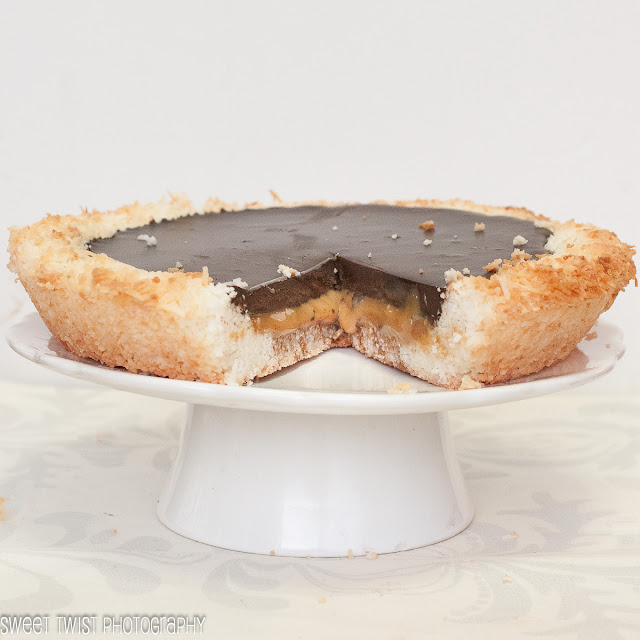
Chocolate Salted Caramel Pie (ie.Best Pie EVER!)

(Note : This photo is the dulche de leche version)


After I made the original version of this pie the first time I was always looking for another reason to make it again.   I was also thinking I need to change it.   The crust on this pie is so easy and I love that it is gluten free.  So over the last year the one thought that would never leave my head was adding a caramel layer to the pie.  However, over the year I got side tracked with other recipes.

One fine day a week ago...there was a reason.  Yippee!  It was the birthday of my good friend Katie who I work with and I wanted to bake her a birthday treat.   I had to do a little re-con and ask her husband secretly through facebook what she loves for dessert.   His response was anything coconut, red velvet, lemon and salted caramel.   Ding Ding Ding! We have a winner, I can make the pie.  I was so excited I could barely keep it a secret from her.

The original version of this pie (sans caramel) is the most viewed item on my blog.   Trust me when I say this,  this version is SOOOOOOO much better.     I also actually made two versions of this pie one with salted caramel and one with salted dulche de leche.   I wanted to see what version might be better, there is a clear winner.
coconut, salted caramel, chocolate, pie, bestpie


I made some changes to the crust from the previous version aswell, the original had way to much coconut.

Chocolate Salted Caramel Pie

(Loosely adapted from Martha Stewart)
Makes one 9-inch pie.


INGREDIENTS:

Crust
  • 1/4 cup + 1 tbsp unsalted butter, softened
  • 3 cups unsweetened shredded coconut
  • 1 cup sweetened shredded coconut
  • 2 tbsp xylitol or granulated sugar
Filling


Chocolate
  • 2/3 cup heavy cream
  • 6 ounces bittersweet chocolate, finely chopped (72% cacao)
Caramel
  • 3/4 cup sugar
  • 1/3 cup water
  • 1/3 cup heavy cream
  • 2 tsp sea salt
or exclude all of the caramel ingredients and use homemade dulce de leche --> Recipe

INSTRUCTIONS:
1 Make the crust: Preheat the oven to 350°F. In a food processor, process butter and 2 cups of unsweetened coconut and xylitol until mixture starts to stick together, 1 to 2 minutes. Transfer to a medium bowl. Combine this mixture with all the remaining coconut,  using your hands to bring together


2 Press coconut mixture into bottom and up sides of pie pan to form crust, leaving top edges loose and fluffy. Cover the crust lightly with tin foil over the edges, and cut a hole in the center.  Keeping the edges covered to prevent burning. Bake until center begins to brown, 10 to 15 minutes; remove foil and bake until edges are browned, 4 to 5 minutes more. Transfer crust to a wire rack to cool completely.


3) Make the caramel sauce.   Place sugar and water in a sauce pan or small dutch oven over medium-high heat.  Allow the mixture to boil until mixture begins to darken, watching carefully so the mixture doesn't burn.
I always keep a pastry brush and small cup of water close by, and occasionally brush the sides of the pan to prevent crystallization.  If you noticed uneven browning, you may have to give the pan a light swirl.


4) When the mixture has turned to a medium amber add the heavy cream, whisking constantly.   The mixture will expand and bubble from the steam.   Add sea salt and stir to combine.


5) Allow the caramel to cool for approx 15 minutes before pouring into the cooled coconut crust.


6)) Make the chocolate filling:  In a small sauce pan bring cream just to a boil.  While cream is heating up, place chopped chocolate into a medium heatproof bowl.  Pour the cream over the chocolate and let sit for 10 minutes to allow chocolate to melt.  Stir to combine and melt remaining chocolate.  The mixture should be smooth and completely melted. Pour onto the caramel layer, smooth out if needed.  Refrigerate until filling is set, 1 hour or up to 1 day. 


If you are using the dulche de leche, omit the caramel steps and pour half can of dulche de lech over the coconut crust and top that with the chocolate.


I think this may be my favorite pie of all time. The people at work were two thumbs to both versions.  I even got a note left on my desk with the statement "AMAZING PIE".    If you have to choose between the salted caramel and the dulche de leche I would choose the salted caramel version.  It is less creamy but salted caramel just has that extra UMPH vs. dulche de leche.

Make this for your Easter dinner, your family won't be disappointed!!

MEG's RATING: D-EEEEEE-LICIOUS.   (That is one E above the limit!)


Pi Day Pie Party

Tuesday, February 28, 2012

Brown Butter Coconut Blossoms

brown butter, coconut, blossoms, hershey's kiss, cookies

Leap day.   It seems like such an odd concept no?  I  was curious as to why it exists,  this is what wiki tells me..
"A leap year..contains one extra day... in order to keep the calendar year synchronized with the astronomical or seasonal year. Because seasons and astronomical events do not repeat in a whole number of days, a calendar that had the same number of days in each year would, over time, drift with respect to the event it was supposed to track. By occasionally inserting an additional day or month into the year, the drift can be corrected."

Hmmm..  Interesting stuff.   Maybe I will only make these cookies every four year.   BAHAHA.  Probably not.  Happy Birthday to all those who are much younger than they are.

My husband got me Hershey's kisses for Valentine's Day.  I am however not a fan of Hershey's kisses to eat. I might have mentioned this before but when I eat chocolates I need to have an additional crunch or texture change.  Which is probably why I am obsessed with Mini Eggs, M&M Pretzels and dark chocolate almonds. Luckily my hubby was smart enough to also get me Mini Eggs so I ate those and threw the kisses in the freezer for future baking.  The future is now.

Brown Butter Coconut Blossoms
(Adapted from Anna Olson)

Makes 24 cookies
INGREDIENTS: 
  • 3/4 cup butter, unsalted
  • 1/2 cup brown sugar
  • 1/4 cup granulated sugar
  • 1 large egg
  • 1/2 cup unsweetened coconut, shredded
  • 1 tsp pure vanilla extract
  • 1 cup unbleached all purpose flour
  • 1 tbsp cornstarch
  • 1/2 tsp baking soda
  • 1/2 tsp salt
  • 24 Hershey's Kisses, frozen


INSTRUCTIONS:
1) In a small skillet, heat butter on mediium heat until butter begins to slightly brown,  Remove from heat and let cool.  Preheat oven to 350F.
2) In a small bowl, whisk together flour, cornstarch, baking soda and salt.
3) Place coconut in mini processor and run until it becomes fine.


4) Add browned butter and sugar in a large bowl or your mixer bowl and beat on medium until well combined.  Add the egg and vanilla and mix again to combine.


5) Add the processed coconut and mix to combine.   Add flour mixture and mix until just combined.


6) Using a small scoop place the little cookie rounds on a silpat or parchment lined baking sheet.  Bake the cookies 8-10 minutes, cookies will be golden.   While the cookies are baking unwrap the Hershey's kisses. As soon as you remove the cookies from the oven gently press the kiss into the cookie.   Let cool a few minutes and then place on a wire rack to cool completely.   Store in a air tight container.


Is everything with brown butter better?  Say that 5 times fast.  I think it might be, the nutty flavour is so unique and tempting.    It is a great combination with the coconut as well, neither overpowers each other.  A new favorite to the blossom cookie category.  

MEG's RATING : D-EEEEE-LICIOUS!

Related Posts Plugin for WordPress, Blogger...