Image Map
Showing posts with label mint. Show all posts

Wednesday, December 19, 2012

10 Days of Cookies - Day 5 - Candy Cane Cheesecake Bars


Last Wednesday was my annual Mother-Daughter baking day.   My mom, sister, niece, daughter and I got together for some Christmas Baking. This is by far one of my favorite days.  Obviously most of the baking is done by my mom, sister and I.  My niece is very helpful at adding the raisins to the butter tarts and well my little one just slept and looked cute.  Thanks to a great friend, she does her apron ready to go when she can help.


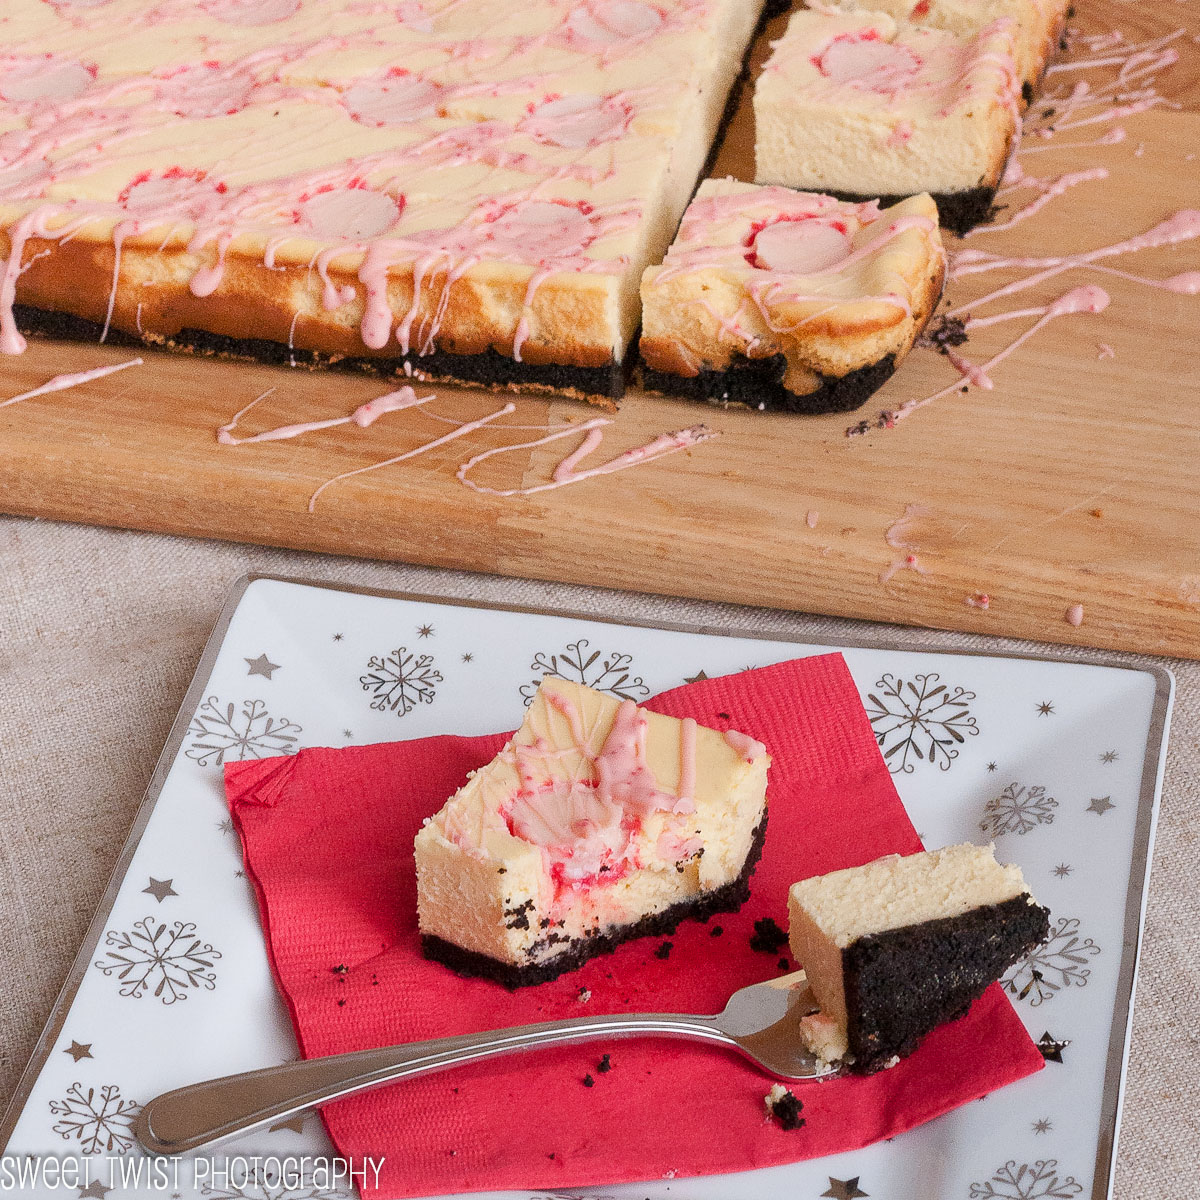
As always we started with our butter tarts but we also baked up three different bars.  It was a very busy day, starting at 11 and ending at 4.  All treats turned out very well. These bars were my sisters idea as she brought over a large tub of cream cheese so our natural choice was to make some cheesecake bars.  She also brought candy cane kisses so I decided to bring them together.   Apparently she doesn't "know" how to make cheesecake so this is what I came up with.

Candy Cane Kiss Cheesecake

INGREDIENTS:

  • 1 1/2 cup oreo crumbs
  • 1/3 cup unsalted butter, melted
  • 3 1/2  8 oz packages 
  • 1 cup granulated sugar
  • 4 eggs + 1 egg yolk
  • 1 1/2 tsp pure vanilla extract
  • 1/4 cup sour cream
  • 25 candy cane kisses + extra for melting and drizzling

INSTRUCTIONS:
1) Preheat oven to 350F.  Line a 9x13 pan with tinfoil, up all edges. 
2) Combine crumbs and butter in a medium bowl , until crumbs are well moistened.  Press down into pan.  Bake for 10 minutes. Remove from oven and let cool.  
3) In your mixer bowl, beat with paddle the cream cheese until smooth.   Add granulated sugar and beat on medium until combined. 
4) Add eggs and yolk, one at a time, beating until each egg is almost combined.   Add in vanilla and sour cream and combine. 
5) Pour cheesecake filling over the crust.   Place the kisses in rows, with a kiss for each square. 
6) Bake at 400 for 10 minutes.  Reduce to 300 and bake for 25 minutes.  Turn off oven and let sit for 15-20 minutes. 
7) Melt the extra kisses and drizzle over the top.  Cut into squares. 


I think I am slowly starting to appreciate mint and chocolate together.  I did give most away to my sister but I did make sure to keep a few for myself and my party.    

MEG's RATING : D-EEEEE-LICOUS!


Thursday, November 8, 2012

Mint Chocolate Malt Ball Lentil Brownies


Tomorrow is my last day of work before I go on mat leave for the next year or so.  It has obviously been a 9 month countdown which as it got closer I was getting more and more excited but now that this is the last week it feels a little weird.  I am developing this feeling of missing out.  This has been a very busy year at work and I have felt like I made a big contribution this year and was needed.   So now that I am leaving and getting this sense that things will go on as normal,  its sort of weird.
Now don't get me wrong there is still a part of me that is super excited for this next adventure of baby, a year I am sure I will never forget (except for maybe the first weeks during major sleep deprivation).  I am looking forward to even a re-focus of what I really want moving forward and a focus back to here, the blog.  Hopefully in the next year I can make some changes, get into a pattern, and bake more.   My new concern will be where do I bring my baking in the next year,  if it is in my house it will be a rough ride trying to lose those baby pounds.

Since I opened a can of lentils last week to make my Banana Lentil Muffins, I didn't want to waste the remaining 1/2 can so I decided to try another recipe with lentils.   I of course had to bring a treat in my last week of work and figured brownies would be a good choice.  I was at the bulk barn the other day and all the holiday candies and chocolates are out. Something that got me completely excited.  I spotted these new mint chocolate malt balls and couldn't resist.

Mint Chocolate Malt Ball Lentil Brownies

(adapted from Canadian Lentils)

INGREDIENTS:


  • 1/2 cup lentil puree  (1/2 cup lentils + 2 tbsp water, pureed together)
  • 1 1/2 cups granulated sugar
  • 1/2 cup butter, melted. 
  • 3/4 cup cocoa powder
  • 1/2 tsp salt
  • 3 eggs
  • 1 cup unbleached all purpose flour
  • 3/4 tsp baking powder
  • 1 1/2 cups chopped mint chocolate malt ball


INSTRUCTIONS:

1) Preheat the oven 350F.  Grease a 9 x 13 pan.
2) Combine lentil puree, sugar, melted butter, cocoa powder and salt.  Mix together.


3) Add eggs, one a time stirring until just combined.
4) Add flour and baking powder.  Stir until almost combined.
5) Add chopped mint malt balls, reserving a handful to toss on top.

Look how pretty they are!

6) Pour into the prepared pan.   Bake for 16 minutes.  Add remaining malt balls to the top.
7) Bake for another 4-6 minutes.   Remove from oven and let cool

Another successful recipe with lentils.   I am not a huge mint and chocolate fan but these malt balls were quite tasty, so in brownies it really worked.   These brownies were moist and minty.

MEG's RATING : D-EEEE-LICIOUS!


Sunday, December 4, 2011

Chocolate Mint Sandwich Cookies - 12 Days of Cookies - Day 3


I am going mad with cookies.  Today I baked 200 gingerbread men for a cookie order I have been asked to do.  I also got in another recipe for my 12 days of cookies.  I have finally finished putting up my Christmas decorations.   I was out of my one day get it all done routine this year and did bits and pieces every night.  At the end of it my husband told me today he can't turn his head anywhere with out seeing something Christmas.  Mission success. That is the why I like it.

One of my favorite decorations is a 3 foot tall Santa that is carrying a carved wooden basket. The funny thing  is he was a very impulse purchase.  So much of an impulse that my friend Tasha and I had to carry him over 8 blocks in downtown Toronto to get him to her Condo.  I put it right at my front door and place mini candy canes or treats in the basket.  I love it.

What is the holidays with out candy canes?  What is the holidays with out cookies? Let's kill two birds with one stone shall we.   I made this recipe for the first holiday issue of Eat In Eat Out Magazine.  It is a beautiful magazine with a lot of great recipes, features on other Canadian bloggers and restaurant reviews. Please check it out if you haven't already and here is my recipe if you missed it in the magazine.

Chocolate Mint Sandwich Cookies – Yields 20 Sandwich Cookies

Cookie
  • 1/2 cup (135 gr) butter
  • 1/2 cup (125 gr) light brown sugar 
  • 1/4 tsp salt 
  • 1 tsp vanilla 
  • 1 large egg 
  • 1 2/3 cups (250 gr) unbleached all purpose flour 
  • 1/2 cup cocoa powder 
  • 2 teaspoon baking powder 
  • 1 teaspoon espresso powder 
Filling
  • 1/2 cup (115 gr) butter 
  • 1/4 cup (50 gr) shortening 
  • 1 3/4 - 2 cups (230 grams) confectioners’ sugar 
  • 2 tablespoons milk 
  • 1 tsp mint 
  • A toothpick prick of red colour paste/gel 
  • 6 mini candy canes, crushed 

Instructions:

1) Preheat oven to 350F. In a medium bowl sift together flour, cocoa powder, salt, baking powder and espresso powder
2) Combine butter and sugar in a large bowl/mixer bowl and beat together until creamy. Add egg, and vanilla, combine until incorporated
3) Add flour mixture to wet mixture, beating at medium speed until just combined.
4) Turn out cookie dough on to a lightly floured surface and form into a disc. Cover in saran wrap and refrigerator for an hour. If the cookie dough is too firm to roll, allow to soften slightly.
5) On a lightly floured surface, roll out the dough to a 1/8 inch thick and cut into 2 ½ inch scalloped circles. Place a on a parchment/silpat lined baking sheet. Bake for 12 minutes. Cool cookies on a wire rack.


6) Make the filling: Combine butter and shortening in a medium bowl and beat until smooth.
7) Add the icing sugar, milk and mint extract and beat together until sugar combined. Add red food colouring and beat to blend in colour. Filling will be light pink.
8) Using a mini spatula, add approximately 2-3 tablespoons of icing on the bottom of one cookie. Top with another cookie, press together and roll the sandwich cookie through the crushed candy canes. Repeat with remaining cookies.


Now I have mentioned before that I don't love mint and chocolate together but I would eat these.   They are so cute and festive.  Since I am not a mint/chocolate expert I always ask for the rating from others.   The plate of these cookies didn't last five minutes at work.  Word traveled fast and they were devoured.  I am going to take that as sign they were pretty good.

MEG's RATING : D-EEEEE-LICIOUS

Tuesday, July 26, 2011

Mint ice cream with mint Areo bubbles.


Yep, another ice cream to add to the list. I can't help if there are lots of summer events that require homemade ice cream.  It's fate. This year I am destined to make quart after quart of delicious homemade ice cream.    Ice cream  is just the perfect summer way to cool down on those hot and humid days.  I can actually think of 3 more events coming up in August. Hmm...three new flavours to think of.   The most recent summer event that required ice cream was a friend's bachelorette party.  Ten girls ventured up to Collingwood, to hang out at a spa, get massages, enjoy the sun, drink, eat, enjoy each other's company, and celebrate the bride!  I, of course signed up to bring the desserts.   I brought the Blueberry Banana Bread, a giant cookie (to be posted) and this post, Mint Areo Bubbles Ice Cream.  I have been pretty faithful to my previous ice cream base,  as it seems to be pretty flawless. I, however am adventurous and crazy so  I am going to try another one.

Mint ice cream with mint Areo bubbles.

(Adapted from Cooks Illustrated)

INGREDIENTS:
  • 1 1/2 cups skim milk
  • 1 1/2 cups 18% or 10% cream
  • 3/4 cup granulated sugar
  • 1 tsp pure vanilla extract
  • 4 large egg yolks
  • 1 1/2 tsp mint extract
  • 1 bag of Areo mint bubbles
  • A tiny toothpick scrap of green food paste


INSTRUCTIONS:
1) Combine the milk, cream, 1/2 cup of the sugar, and the vanilla in a medium saucepan.  Stir over medium heat until milk is warm,  about 5 minutes.


2) In a medium bowl, whisk together the yolks and remaining 1/4 cup sugar until combined and pale yellow. Whisk half the warm milk mixture into the beaten yolks, 1/2 cup at a time, until combined. Whisk the milk-yolk mixture into the warm milk in the saucepan.  Heat over medium heat and cook, stirring constantly with a wooden spoon, until steam appears, foam subsides, and the mixture is slightly thickened (instant-read thermometer registers 180 to 185 degrees). Be sure to not let the mixture bowl as the eggs will curdle.


3) Using a mesh strainer/sieve, run the egg/yolk mixture into a medium bowl.  Set the bowl into a large bowl with a ice water bath. Cover the mixture with saran wrap placed on the mixture. Place in the refrigerate for at least 3 hours or up to 24 hours.


4) Stir in the mint extract and green paste and pour the custard into the ice cream machine canister and follow the manufacturer’s instructions.
5) Chop the Areo bubbles while the mixture is churning. Add half the bubbles in the last 5-10 minutes of churning. Add the remaining bubbles my hand. Transfer the ice cream to an airtight container, press plastic wrap flush against the surface, cover the container, and freeze the ice cream until firm, at least 2 hours.

I am actually not a big fan of mint and chocolate together.  I know, I know.  It's a travesty.  I figure People are chocolate and mint fans or chocolate and peanut butter fans.  I am the latter.  I did try this though and it was quite good, smooth and minty fresh.   I don't really trust myself to rate this but the girls at the bachelorette, thought it was fantastic.  As did my co-worker who went speechless on me and simply asked when the next batch was coming in.

FRIEND's RATING : D-EEEEE-LICIOUS!

mint, areo, chocolate, ice cream


My ice cream collection to date:


    Sunday, January 2, 2011

    Chocolate tarts

    Every and any holiday dinner with my Dad, it is a requirement that I make my apple crumble. However I also find it a requirement to make another dessert, preferably with chocolate for my non fruit eating Husband.   I rifled through my many baking magazines to see what I could create...cookies, brownies, bars, cheesecake, tarts?  Yes, Tarts!  The recipe I found was actually for a s'mores tart that had a graham cracker base, chocolate pastry cream and a marshmallow meringue on top, however I wasn't in the mood for a marshmallow meringue so I choose to do my own Christmas spin.

    Chocolate Hazelnut Tarts

    Adapted from Cuisine at Home, Holiday Baking

    INGREDIENTS:

    Crust:

    •  3 oz hazelnuts, toasted & skinned (1/2 cup)
    • 9 2 1/4 x 5 inch graham crackers
    • 2 Tbsp white sugar
    • 1 stick unsalted butter, melted

    Pastry Cream 

    • 2 eggs
    • 3 tbsp hazelnut syrup or liqueur, divided
    • 1/4 cup cornstarch
    • 1/4 tsp salt
    • 2 cups milk
    • 1/2 sugar
    • 2 oz each bittersweet and milk chocolate, chopped
    • 2 tbsp unsalted butter, softened

    My Variation

    • 3 oz praline pecans
    • 2 tsp pure vanilla extract
    • 2 oz mint chocolate chips
    • Small handfull mini eggs

    INSTRUCTIONS:

    1) Make the Crust : Preheat the oven to 375F.   Put the hazelnuts, graham crackers and 2 tbsp sugar in a food processor and run until fine.  With the processor running, drizzle in the melted butter.   Divide the mixture evenly amoung eight 3 inch tart pans with removable bottoms.  Press the crumbs up the sides and press the bottoms with a flat object similar to a cheesecake base to make the firm crust,   Bake the tartlets crusts for 10 min and then let cool.


    2) Make the Pastry Cream : Whisk together the 2 eggs, 2 tbsp hazelnut syrup, cornstarch and salt.  Set aside. Heat the milk and sugar in a medium sauce pan over medium heat until steam rises. Gradually whisk in both chocolates until melted and fully combined with milk.
    3) Whisk half of the heated mixture into the egg mixture; return the chocolate egg mixture to the remaining milk chocolate mixture in the pan.   Continue cooking on medium heat, whisking often until it thickens.    Boil for 1 more minute constantly whisking to avoid scorching.
    4) Stir in the 2 tbsp butter and remaining hazelnut syrup.  Divide pastry cream evenly amoung cooled crusts.   Let tartlets cool to room temp, cover them with plastic wrap touching the filling to prevent a film.


    MY VARIATION:  I did make a few tweaks based on what I like and had in the cupboard.
    1) My crust variation involved pecan pralines instead of hazelnuts.   Good call # 1.
    2) My pastry cream variation involved removing from the hazelnut syrup/liqueur, although I do enjoy amaretto since I removed the hazelnuts from the crust, I just decided to go with just pure vanilla extract.   I also did use all milk chocolate.   I used semi-sweet chips for some and then mint chocolate chips for half.   After the cream  thickened I split the mixture in two and added some mint chocolate chips and stirred until they melted.  Once it was all combined then I added that mixture to some shells and the non mint to the other shells.
    3) My topping variation:  Instead of the marshmallow topping, I added some of the crushed mint chips to the mint tarts and some Christmas mini eggs to the plain chocolate tarts.

    Another great dessert. I think this crust could have lots of possibilities, especially in a cheesecake.   The praline pecans are a great addition to the typical graham crust.   I am oddly not a big mint chocolate fan but the rest of the dinner table gave them a thumbs up.    You can pre-bake the shells and cream and cover them with saran wrap overnight if needed or to save time on a busy night.   An interesting thing I am finding about this blog is that when I start to write about something I baked I begin to think of all these other variations I could do.  Lots more tarts to come, I guess.....

    MEG's RATING: D-EEE-LICIOUS!


    Related Posts Plugin for WordPress, Blogger...